• Home
  • About
  • Contact
  • Shop My Favs
instagram pinterest twitter facebook bloglovin'

LUNA'S LOVES

Now I am not a baker. I repeat, I am not a baker. So when I was gifted Florida Crystals® Organic Sugar I was racking my brain to bake something that A, I loved, and B, was easy enough for us non-bakers to do. I had a beignet at a foodie event that Andrew and I attended and it was the perfect mix between sweet savory and even had a kick to it. It was so delicious that I went back for seconds and even thought about it for days. This is my interpretation of that beignet but instead of fried, I baked mine. Fried food tends to hurt my stomach if I have too much of it, so I didn't want to go the tradition route. But trust me, nothing is lost in this dessert. Also, you might be hesitant about a cayenne whipped cream, but there is so much sweetness between the honey and powdered sugar that it is exactly what it needed to make this dish perfect. Originally I served it on the side, but then my brilliant husband started to stuff the beignets and our mind were blown just how good it was! Honestly, these really are just as good as they look. 
Ingredients:

Beignets
  • 4 cups flour (plus extra on hand)
  • 1/4 cup of Florida Crystals® Sugar
  • 1 1/2 cup of milk (lukewarm)
  • 1 package of fast activating yeast
  • 1 egg
  • 4 tbs of melted butter
  • 2 teaspoons of salt
  • Extra milk and melted butter for brushing dough
  • Extra powdered sugar for sprinkling on top
  • Honey to drizzle on top
Cayenne Whipped Cream
  • 1/2 cup of Florida Crystals® Powdered Sugar
  • 1/2 cup heavy whipping cream
  • 2 tsp cayenne (plus more if you want more spice)
  • 1 tsp paprika 
  1. Place milking yeast in a bowl and let it sit fro 2 minutes. Then mix in sugar, eggs, and butter.
  2. Slowly mix in flour and salt. Place the (sticky) dough on a floured surface and knead until it is no longer sticky. You might need to mix in a little bit more flour. 
  3. Transfer dough in a large bowl with a damp warm cloth and let rise for 15 minutes. 
  4. Preheat oven to 350.
  5. After dough is done rising, remove excess air and roll out. Cut out dough in 2 inch rectangles. 
  6. Place on a non stick pan and brush with milk. Bake for 12-15 minutes. 
  7. While beignets are still warm, brush with melted butter. 
  8. In a medium bowl add powdered sugar, heavy whipping cream, cayenne, and paprika and mix with an electric mixer until it starts to look more like whipped cream. Note: keep tasting and adjusting until it is to your likeness. 
  9. Put whipped mixture into a piping bag and stuff beignets (it can also be eaten on the side)
  10. Sprinkle powdered sugar on top and drizzle honey on top.
  11. Enjoy!


xx
Luna
Share
Tweet
Pin
Share
No comments


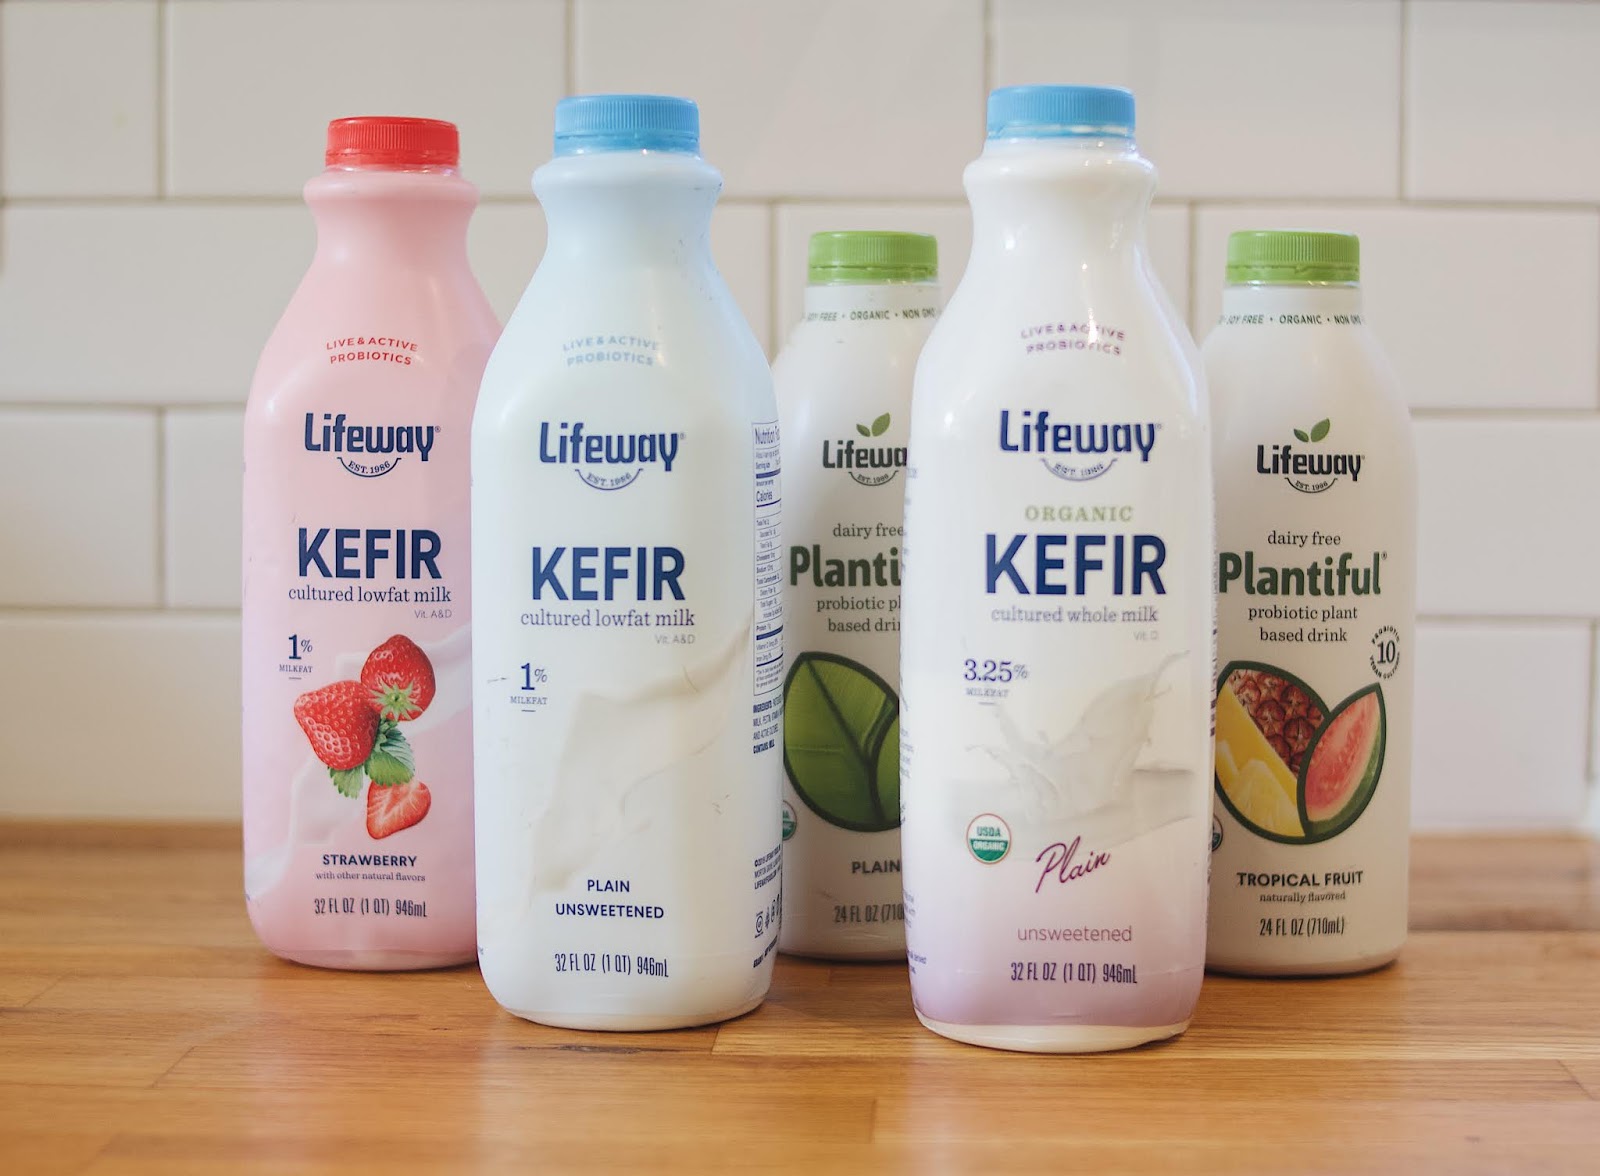
Kefir. Don't stay away from this one because you don't know what it is. It's a lot like yogurt- it is a tangy cultured milk that is high in protein, calcium, vitamin D, as well as many other added benefits. Meaning it's actually good for you! This probiotic drink is a great substitute to your standard non-dairy milks or yogurt based ingredients. If you are vegan, Lifeway also has plant based probiotic drinks that are perfect dairy free options. My husband actually decided to try all of them and voted his favorite is the Plantiful Probiotic drink in the tropical fruit flavor. This one can be enjoyed on its own or added to any of your favorite smoothie recipes. Lifeway Kefir products available for purchase at Sprouts Farmers Market, Walmart Supercenter, and Safeway. RUN don't walk!
Ingredients:
  •  Colorful Carrots
  • 1 Cup  Lifeway Organic Kefir
  • Juice of 1/2 Lime
  • 1 Tsp of Chipotle Powder
  • 1 Tsp of Paprika
  • 1/2 Shallots, sliced thin
  • Handful Pepitas
  • Garlic Head
  • Salt & Pepper, to taste
  • Handful of Parsley
  1. Preheat oven to 400
  2. Take garlic head and peel off outer layer. Cut the top part in half. Coat garlic in olive oil and top with salt and pepper. Cover with aluminum and heat in the oven for 45 minutes. 
  3. Take carrots and coat with oil and salt and pepper. Cook until desired softness. Usually about 30-45 minutes. 
  4. Take garlic once its cooled off and push out garlic cloves. Mix and mash garlic to where it becomes a paste.
  5. Mix Lifeway Organic Kefir, lime juice, shallots, seasoning, and garlic paste. Add salt and pepper to taste.
  6. Once carrots are done, take the kefir mixture and pour on top of carrots. 
  7. Top with pepitas and parsley.
  8. Enjoy!


xx
Luna

Website: https://lifewaykefir.com/
Facebook: https://www.facebook.com/LifewayKefir
Twitter: https://twitter.com/lifeway_kefir
Pinterest: https://www.pinterest.com/lifewaykefir/
Instagram: https://www.instagram.com/lifewaykefir/

Share
Tweet
Pin
Share
No comments
I have a big craving for coconut and lime almost all the time. Even before I was pregnant you could talk me into a coconut and lime combo any day. After drooling over several recipes, I adapted one of my own for a quick and easy meal that seamlessly goes into my meal rotation. This is easily a 30 min meal if you have all the ingredients on hand. It's basically sautéing the veggies, cooking the chicken, and creating the sauce. Plus it's pretty much all in the same pan. Easy and done!
Quick & Easy Coconut Curry
Serves 4, or 2 very hungry people

Ingredients:
  • 2lbs chicken
  • 1/2 red bell pepper, chopped
  • 1/2 onion, chopped
  • 2-3 garlic cloves, minced
  • 1 tbs ginger, or ginger paste (it's WAY easier)
  • 2 tbs red Thai curry paste
  • 1 (8oz) can of coconut milk
  • 1 cup of broccoli 
  • 2  1/2 tbs curry powder (I use a madras curry, but regular curry is fine)
  • Garnish: cilantro, green onion, limes, red cabbage
  • Salt and pepper to taste
  • 1 cub of rice, made in rice cooker
  1. Sauté onions, ginger, garlic with tbs coconut oil or vegetable oil on a medium heat.
  2. Start rice instructions. I use a rice cooker and it's so easy! I recommend a smaller rice cooker because there is really no need to have that much rice. A little goes a long way!
  3. Meanwhile, cut broccoli florets, drizzle with vegetable oil, and top with salt and pepper. Bake at 375 for the remainder of the time (about 15 min).
  4. Add chopped red bell pepper, chicken, curry powder. Cook chicken through.
  5. Add Thai curry paste and mix ingredients. Add more if desired.  
  6. Combine can of coconut milk and let boil for a few min before bringing down to a simmer. Add salt if needed.
  7. While the food is simmering, start cutting garnishes: cilantro, green onion, limes, red cabbage
  8. Finally, check on your broccoli to make sure it is cooked. Then add salt and pepper to curry mixture. 
  9. Assemble your dish how you like it and enjoy! Personally, I like plenty of lime. 
Note: If you want more spice, try adding cayenne pepper. Also, if you don't like broccoli use zucchini or carrots or whatever veggies you do like. Honestly, make it your own!


 xx
Luna

Share
Tweet
Pin
Share
No comments
About two times a week I make this recipe. It's easy, fast, and delicious. Plus it has avocado in it, and you all know how I feel about those. I think what makes it so easy, is that I always just seem to have these items on hand. I can make lunch real quick and still manage to get ready or clean the house or play with RK. anyway, I make this so much that it ends up on my instagram stories and I figured it was about time that I shared this recipe!

Ingredients:
  • 1 Avocado Sliced
  • 1-2 Eggs
  • 1 Cup of Rice
  • 1 -2 Tsp Red Wine Vinegar 
  • 1 Green Onion, thinly sliced
  • Salt and Pepper to taste
  • Siracha (optional)
  • Soy Sauce (optional)
  • Lime (optional)
Instructions:
  1. Start cooking rice. I have a rice cooker and if I make for one it only requires a 2 to 1 ratio one serving.
  2. Fry your eggs, and season with salt and pepper.
  3. When the rice is almost done, slice green onion and avocado. 
  4. When the rice is done, add green onion and red wine vinegar. Mix well. 
  5. Place rice in bowl, then avocado, then fried egg. Put siracha, lime, or soy sauce as desired. Enjoy!


xx
Luna
Share
Tweet
Pin
Share
No comments

Honestly, if it wasn't for Andrew I would probably forget to eat the majority of the time. And on most days you can see him in the kitchen making most of our family meals. When I cook, I want it to be fast, delicious, and good for me. This dish checks off all those boxes (and if you are vegan, you can easy make a tofu scramble and do dairy free cheese). The tomatoes add a brightness and sweetness to the dish that compliments well with the quest fresco. For extra kick, I add Tapatio and it's exactly what it needs to finish out strong. Also, there are avocados- who can say no to avocados? Hope you enjoy!
Ingredients: (serves 2, 2 tacos each)
  • 4 eggs
  • Cherry tomatos
  • 1 Avocado
  • Queso Fresco
  • Tortillas 
  • 2 tsp Cayenne or more if you like it spicy
  • 2 tsp Garlic power
  • Salt and pepper to taste 
  • Cilantro (if desired)
  • Tapatio or salsa

  1. Start cooking eggs. sprinkle cayenne and garlic. Begin to scramble and let cook.
  2. Meanwhile, cut tomatoes in long thin slices, crumble the quest fresco, slice avocado. 
  3. Warm up tortillas and assemble taco- eggs, tomato, avocado, quest fresco and top with tapatio.
  4. Enjoy!

xx
Luna

Share
Tweet
Pin
Share
No comments
If I'm honest, I live by an 80/20 rule for my life. 80% of the time I am putting in the work to eat clean, exercise, or check what is in my products. But there are a lot of times where I don't have that luxury or I don't care to care. You know what I mean? Sometimes I what a greasy burger, a fruity cocktail, and desert. Because there's always room in the desert stomach. It's helpful for me to have snacks on hand. So I am sharing this recipe of these Easy Almond Butter Energy Bites. I usually put a few in my purse when I know that I am going to be out and might be hungry. I hope you enjoy!
Easy Almond Butter Energy Bites:

Ingredients
  • 2 Cups Almond Butter
  • 1/4 Cup Honey
  • 3 Cups of Oats
  • 3 Tbs Cacao Powder
  • 1 Tbs Cinnamon
  • 1 Tbs Maca (optional)
  1. Put the almond butter and honey in a bowl and mix together. Slowly stir in 3 cups of oats.
  2. Form mixture into balls that are 1 inch wide. 
  3. Mix the cacao and cinnamon together. and coat each ball with the mixture. 
  4. Place energy balls on a baking sheet and chill for at least 1 hour. 
  5. Enjoy!


xx
Luna
Share
Tweet
Pin
Share
No comments
Older Posts

About me

I'm Luna. I'm married to my best friend, Andrew & I am mother of two: Ryan-Kate & Franics. I love to eat, travel, and be creative. Here is my blog about life and other beautiful things that inspire me. Stay awhile why don't cha!

Follow Me

  • instagram
  • pinterest
  • twitter
  • facebook
  • bloglovin'

recent posts

Sponsor

Blog Meets Brand

Blog Archive

  • ▼  2020 (13)
    • ▼  November (1)
      • Homemade Christmas Ornaments
    • ►  September (1)
    • ►  July (1)
    • ►  May (2)
    • ►  April (2)
    • ►  March (4)
    • ►  February (2)
  • ►  2019 (18)
    • ►  November (4)
    • ►  October (3)
    • ►  August (1)
    • ►  July (1)
    • ►  June (2)
    • ►  May (2)
    • ►  February (2)
    • ►  January (3)
  • ►  2018 (13)
    • ►  October (1)
    • ►  June (2)
    • ►  April (1)
    • ►  March (3)
    • ►  February (3)
    • ►  January (3)
  • ►  2017 (35)
    • ►  December (1)
    • ►  November (5)
    • ►  October (2)
    • ►  September (2)
    • ►  August (4)
    • ►  July (2)
    • ►  June (4)
    • ►  May (6)
    • ►  April (3)
    • ►  March (4)
    • ►  February (1)
    • ►  January (1)
  • ►  2016 (24)
    • ►  December (5)
    • ►  November (6)
    • ►  October (2)
    • ►  September (2)
    • ►  August (2)
    • ►  June (3)
    • ►  May (4)
  • ►  2014 (8)
    • ►  May (1)
    • ►  April (2)
    • ►  February (3)
    • ►  January (2)
  • ►  2013 (26)
    • ►  December (4)
    • ►  October (3)
    • ►  September (4)
    • ►  August (10)
    • ►  April (3)
    • ►  February (1)
    • ►  January (1)
  • ►  2012 (118)
    • ►  December (3)
    • ►  November (9)
    • ►  October (11)
    • ►  September (6)
    • ►  August (14)
    • ►  July (14)
    • ►  June (14)
    • ►  May (15)
    • ►  April (15)
    • ►  March (10)
    • ►  February (6)
    • ►  January (1)
Facebook Twitter Instagram Pinterest Bloglovin
FOLLOW ME @Lunasallett

Created with by ThemeXpose