• Home
  • About
  • Contact
  • Shop My Favs
instagram pinterest twitter facebook bloglovin'

LUNA'S LOVES

Have you ever just let a bag of cuties go bad without ever eating one or is it just me? Because I had been watching my orange slices for weeks now, I decided to make Christmas decorations using what I had around the house. This is the earliest I've started my Christmas decorations, but I figured that the way things have gone this year, we all need a little goodness. For me, that meant pulling put my Christmas boxes. Want to make your own? Here's what you will need:
Supplies
  • Floral Wire
  • String or Twine
  • Cinnamon Sticks
  • Dried Floral, either bought or just dry out your own
  • Dried Orange Slices, Directions down below 
Directions: 
  • To dry our oranges, first preheat your oven to 200 degrees. Dab any excess moisture, then slice and place slices directly on rack for 4 hours. Flip and check every 30 min. 
  • Gather your supplies. Using the floral wire, you will want to secure your dried eucalyptus to the cinnamon stick. If there is any excess wire, just pierce the dried orange slices so that they don't fall off your ornament. 
  • Pull your string through the wire and then you're done!
If you have any extra slices, like I did, try making your own garland. It's super cute and I love the way it looks with velvet ribbon and peach chiffon. 

xx
Luna


Share
Tweet
Pin
Share
No comments
I've a few projects that I am excited to share with you about! But only one at a time, haha. Here is one of a few The Bead Shop Lab. I've always loved creating things- so while we have been social distancing and hunkering at home, I decided to keep my hands busy. 40% of profits go to helping those affected by COVID-19. If you'd like to help follow the link HERE and donate directly or you can get some beads and we will donate on your behalf. 
Prices: 
  • $8 for pre-made beads
  • $10 for custom
  • $12 for necklace 
  • $3 for shipping


xx
Luna
Share
Tweet
Pin
Share
No comments
I got this crazy idea where I wanted to do an Easter egg craft with Ryan-Kate. It mainly consisted of my doing all the work while she played with her friend. She is responsible for two eggs the brighter blue one and a pink one, which are ironically not the "natural" dye method and the most vibrant of the bunch ( **insert cry laugh emoji**). Here's the conclusion I came to: natural dye is tedious longer process that my child did not care for. Luckily, I had an store bought dye for Ryan-Kate and her friend to participate, resulting in the most successful attempts of Easter Dye. Although the pastels are quite beautiful in my opinion, so I'm not complaining. 
Here's what I did:
  1. Boil eggs. 
  2. Colors: yellow-saffron, blue- red cabbage, and brown- coffee. 
  3. Yellow- Saffron. Boil water and add 1 tbs of saffron with 1 tbs of vinegar. After egg is fully boiled add it to the saffron and boiled water.
  4. Blue- red cabbage. For this one add several red cabbage leaves with a 1 quart of boiling water, uncooked egg, and 1 tbs of vinegar. After the egg is done, continue to let the egg sit in the dye. The the longer the better.
  5. Brown- coffee. I make French press most morning and just used my left over ground with some boiling hot water, 1 tbs of vinegar all in a mason jar. Again the longer it sits the better!


xx
Luna

Share
Tweet
Pin
Share
No comments
As you all know, Andrew has been working hard over his food blog at Bachelor Cooking. You know, since I met him I have been telling him to start a food blog. So, yes, I am taking credit for his new hobby.
Anyway, I got this great idea to create a light box so that his pictures look more clean. My mom shipped in some stuff from Dallas, so I had three big boxes laying in the office. 
  • Cut out three sides leaving only a frame
  • Find a thin, airy paper that light can come through and is almost translucent
  • Cut paper accordingly and  tape to your sides
  • You're finished!
That's it. it was super easy! I tested it out with some flowers that i head and it works great. The natural light with the white paper brightens up whatever I am taking a picture of- I love being crafty.


Share
Tweet
Pin
Share
No comments
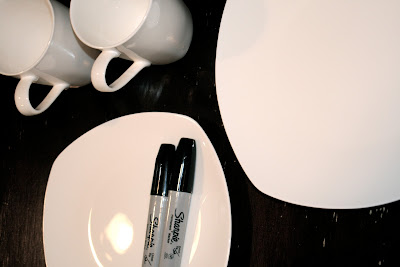
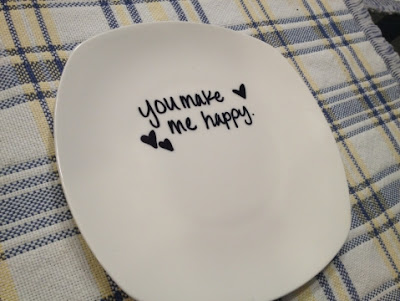
This week I got a little creative and made something for my fella for our date night. It was super easy and he enjoyed it so much. 
Here is what you need:
- Porcelain dish ware of your choice (cups, plates, or bowls)
- Sharpie Markers
Directions:
- Set the timer for 30 min and bake at 350 and then you are all set!
- Make sure to hand wash only

Share
Tweet
Pin
Share
No comments
Have you seen the new fad lately of handwritten script? I'm just crazy about it right now- Im finding them all over Pinterest. It has been done with chalkboards, invites, and posters. Take a look and tell me what you think!


Share
Tweet
Pin
Share
No comments
Older Posts

About me

I'm Luna. I'm married to my best friend, Andrew & I am mother of two: Ryan-Kate & Franics. I love to eat, travel, and be creative. Here is my blog about life and other beautiful things that inspire me. Stay awhile why don't cha!

Follow Me

  • instagram
  • pinterest
  • twitter
  • facebook
  • bloglovin'

recent posts

Sponsor

Blog Meets Brand

Blog Archive

  • ▼  2020 (13)
    • ▼  November (1)
      • Homemade Christmas Ornaments
    • ►  September (1)
    • ►  July (1)
    • ►  May (2)
    • ►  April (2)
    • ►  March (4)
    • ►  February (2)
  • ►  2019 (18)
    • ►  November (4)
    • ►  October (3)
    • ►  August (1)
    • ►  July (1)
    • ►  June (2)
    • ►  May (2)
    • ►  February (2)
    • ►  January (3)
  • ►  2018 (13)
    • ►  October (1)
    • ►  June (2)
    • ►  April (1)
    • ►  March (3)
    • ►  February (3)
    • ►  January (3)
  • ►  2017 (35)
    • ►  December (1)
    • ►  November (5)
    • ►  October (2)
    • ►  September (2)
    • ►  August (4)
    • ►  July (2)
    • ►  June (4)
    • ►  May (6)
    • ►  April (3)
    • ►  March (4)
    • ►  February (1)
    • ►  January (1)
  • ►  2016 (24)
    • ►  December (5)
    • ►  November (6)
    • ►  October (2)
    • ►  September (2)
    • ►  August (2)
    • ►  June (3)
    • ►  May (4)
  • ►  2014 (8)
    • ►  May (1)
    • ►  April (2)
    • ►  February (3)
    • ►  January (2)
  • ►  2013 (26)
    • ►  December (4)
    • ►  October (3)
    • ►  September (4)
    • ►  August (10)
    • ►  April (3)
    • ►  February (1)
    • ►  January (1)
  • ►  2012 (118)
    • ►  December (3)
    • ►  November (9)
    • ►  October (11)
    • ►  September (6)
    • ►  August (14)
    • ►  July (14)
    • ►  June (14)
    • ►  May (15)
    • ►  April (15)
    • ►  March (10)
    • ►  February (6)
    • ►  January (1)
Facebook Twitter Instagram Pinterest Bloglovin
FOLLOW ME @Lunasallett

Created with by ThemeXpose